How to Compress Images Without Losing Quality
Large images slow down websites and hurt SEO. Learn 7 proven methods to compress images for the web without visible quality loss.
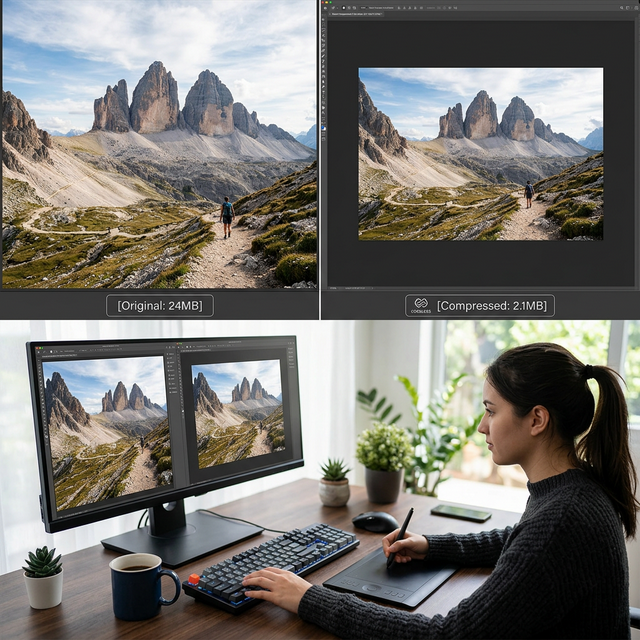
Every uncompressed image on your website is a silent performance penalty. A single 5 MB photograph forces your visitor to download five million bytes of data just to see one picture — data that adds seconds to your page load time, consumes mobile data allowances, and signals to Google that your site is slow. The frustrating reality is that the same photograph could look visually identical at 380 KB — a 93 percent reduction — if compressed correctly. Most website owners are serving images that are five to ten times larger than necessary, paying the performance cost on every page view without realizing it. This guide explains seven proven compression methods that reduce file sizes dramatically without introducing visible quality loss, covering everything from automated browser tools to manual format selection and dimension optimization.
Why Image Compression Matters for Speed and SEO
Image files are typically the largest assets on any webpage, accounting for 40 to 60 percent of total page weight on an average website. When Google measures your page speed for ranking purposes, the time it takes to load and render these images directly impacts your Core Web Vitals scores — particularly Largest Contentful Paint (LCP), which measures how quickly your largest visible content element becomes visible to the user.
A page with three uncompressed 4 MB photographs requires the visitor to download 12 MB of image data before the page feels complete. On a 10 Mbps mobile connection, that translates to roughly 10 seconds of loading time just for images, not including HTML, CSS, JavaScript, and fonts. The same three photographs compressed to 300 KB each total only 900 KB — loading in under one second on the same connection. This difference between a ten-second load and a one-second load directly determines whether the visitor stays or bounces.
Google's own research confirms the stakes: as page load time increases from 1 second to 3 seconds, bounce probability increases by 32 percent. From 1 second to 5 seconds, bounce probability increases by 90 percent. For most websites, compressing images is the single highest-impact performance optimization available — delivering larger speed improvements than minifying code, reducing server response times, or implementing advanced caching strategies.
Lossy vs. Lossless Compression — Understanding the Difference
Before applying any compression method, you need to understand the fundamental distinction between lossy and lossless compression, because each approach has different implications for image quality, file size, and use case suitability.
Lossless compression reduces file size by finding and eliminating redundant data patterns without altering any pixel values. When decompressed, the image is bit-for-bit identical to the original. PNG uses lossless compression. The trade-off is that the size reduction is modest — typically 20-40 percent for photographs, though significantly better for images with large areas of uniform color like screenshots, diagrams, and graphics.
Lossy compression achieves dramatically larger file size reductions (60-95 percent) by selectively discarding image data that the human visual system is least likely to notice. JPEG and WebP are lossy formats. At moderate compression levels (quality 75-85 percent), the discarded information is effectively invisible to the human eye in normal viewing conditions. At aggressive compression levels (quality below 50 percent), artifacts become visible: blocky regions, color banding, halos around edges, and loss of fine detail.
The practical decision: For photographs and complex images with gradients and many colors, lossy compression at quality 75-85 percent delivers the best balance of size and quality. For screenshots, logos, icons, and images requiring exact color reproduction, lossless PNG is the appropriate choice — even though the resulting files are larger.
✅ Pro Tip
Quality 75-85% JPEG achieves 60-80% size reduction with minimal visible loss. This is the practical sweet spot for web images. At quality 80%, a 5 MB photograph typically compresses to 500 KB-1 MB — a 80-90% reduction — while remaining visually indistinguishable from the original at normal viewing distances. Always compress from the original source file, never from an already-compressed version, to avoid compounding quality loss across multiple compression cycles.
Method 1 — Browser-Based Compression Tools
The fastest way to compress an image is through a free browser-based tool that handles the optimization automatically. These tools require no software installation, no account creation, and process your image within seconds.
FileCast Image Compressor processes images directly in your browser using client-side JavaScript — your image never leaves your device. Drag your file onto the tool, adjust the quality slider if needed, and download the compressed result. This client-side approach ensures privacy and eliminates upload/download wait times for large files.
Squoosh is Google's open-source image compression tool that provides real-time, side-by-side quality comparison. You can see exactly how different compression levels affect your specific image before committing. Squoosh supports multiple output formats including WebP, AVIF, JPEG, and PNG, making it useful for format experimentation.
TinyPNG/TinyJPG applies intelligent lossy compression that analyzes each image individually, targeting areas where quality reduction will be least noticeable. The service accepts up to 20 images simultaneously at up to 5 MB each on the free tier. While the images are processed server-side (uploaded to TinyPNG's servers), the service claims to delete files after compression.
Method 2 — Choose the Right Format From the Start
Using the wrong image format for your content type can result in files that are 3-10 times larger than necessary, regardless of how aggressively you compress them afterward. Choosing the right format before compression is one of the most impactful decisions you can make.
Use JPEG for photographs, real-world images, and any content with complex gradients, textures, and many colors. JPEG was designed specifically for photographic content and its compression algorithm excels at this type of visual data.
Use PNG for screenshots, logos, icons, diagrams, and any image requiring transparency or exact color reproduction. PNG handles sharp edges, text, and areas of uniform color far better than JPEG, which introduces artifacts around such elements.
Use WebP whenever browser support allows (97+ percent of browsers in 2026). WebP produces files 25-34 percent smaller than JPEG at equivalent visual quality, making it the optimal default format for web content in modern applications.
Method 3 — Resize Images to Display Dimensions
One of the most common and costly performance mistakes is serving images at resolutions far exceeding their display size on the page. If your blog layout displays images at 800 pixels wide, uploading a 4000-pixel-wide DSLR photograph forces every visitor to download five times more pixels than will ever be displayed. The browser downloads the full 4000-pixel image, then scales it down to 800 pixels for display — wasting bandwidth and processing time on data the visitor never sees.
The solution: Before uploading any image, resize it to match its maximum display dimensions. A blog content image that displays at 800 pixels wide should be resized to 800 pixels (or 1600 pixels for retina displays). A thumbnail that displays at 200 pixels should be resized to 200 pixels (or 400 pixels for retina). This single step alone can reduce file size by 70-90 percent for DSLR and smartphone photographs.
💡 Key Insight
Serving oversized images is one of the most common performance mistakes on the web. A 4000x3000 pixel photograph contains 12 million pixels. Resized to 800x600 for web display, it contains only 480,000 pixels — 96% fewer pixels and a proportional reduction in file size. Always resize to your display dimensions (doubled for retina) before applying any other compression technique.
Method 4 — Strip EXIF Metadata
Every photograph taken with a smartphone or digital camera embeds metadata called EXIF data into the image file. This metadata includes the camera model, lens specifications, shutter speed, aperture, ISO, GPS coordinates where the photo was taken, date and time, and sometimes a thumbnail preview. While this information is useful for photographers organizing their collections, it serves no purpose on the web and adds unnecessary bytes to every image file.
EXIF metadata typically adds 10-50 KB per image. While this sounds small, multiplied across an image-heavy page with 20 photographs, it represents 200 KB to 1 MB of completely wasted bandwidth. More importantly, GPS coordinates embedded in personal photographs create a significant privacy concern — publishing images with location data can reveal your home address, workplace, or daily routines to anyone who examines the file metadata.
Most browser-based compression tools strip EXIF data automatically during processing. If using a manual workflow, dedicated tools like ExifTool or the "Save for Web" export option in image editors will remove metadata while preserving image quality.
Method 5 — Convert to WebP Format
WebP is a modern image format developed by Google that achieves 25-34 percent smaller file sizes than JPEG at equivalent visual quality. With 97+ percent browser support in 2026, WebP is the most impactful format conversion available for web optimization.
Converting an existing JPEG photograph to WebP at the same quality level reduces the file size by roughly one-third without any visible difference. A 600 KB JPEG becomes a 400 KB WebP. Across an entire website with hundreds of images, this conversion reduces total image bandwidth by hundreds of megabytes — directly improving page speed, reducing hosting costs, and improving Core Web Vitals scores.
FileCast's Image to WebP converter handles the conversion directly in your browser. Upload your JPEG or PNG, configure the quality level (80 is recommended for most content), and download the WebP result. For batch conversion of entire image libraries, command-line tools like Google's cwebp utility process hundreds of files in seconds.
Method 6 — Implement Lazy Loading for Below-the-Fold Images
While not a compression technique in the traditional sense, lazy loading dramatically reduces the effective payload of image-heavy pages by deferring the download of images that are not immediately visible in the viewport. Instead of loading all twenty images on a gallery page simultaneously, lazy loading loads only the three or four images visible on screen, then loads additional images as the user scrolls toward them.
Implementing lazy loading is straightforward in modern HTML. Adding
loading="lazy" to any <img> tag tells the browser to defer loading that
image until it is within a configurable distance of the viewport. This native browser feature requires no
JavaScript library, no build tool configuration, and no server-side changes — a single HTML attribute
per image tag.
The performance impact is substantial. A page with twenty images totaling 4 MB of data reduces its initial load to approximately 800 KB (the four visible images) when lazy loading is implemented. The remaining 3.2 MB loads incrementally as the user scrolls, preventing any single moment of heavy bandwidth consumption from blocking page rendering.
Method 7 — Combine Multiple Techniques for Maximum Reduction
The methods described above are not mutually exclusive — they are most effective when combined systematically. A professional image optimization workflow applies multiple techniques in sequence, compounding the size reductions at each step.
Recommended workflow order: Start by resizing the image to its display dimensions (Method 3), which provides the largest single reduction. Then strip EXIF metadata (Method 4) to remove unnecessary bytes. Convert to WebP format (Method 5) for an additional 25-34 percent reduction. Finally, apply lossy compression at quality 80 (Methods 1-2) to achieve the optimal size-quality balance.
Applied in sequence, these techniques routinely reduce a 5 MB DSLR photograph to under 100 KB — a 98 percent reduction — while maintaining visual quality that is indistinguishable from the original at the intended display size. This compounded approach is what separates professionally optimized websites from sites that apply a single compression step and call it done.
Target File Sizes for Different Use Cases
Knowing your target file size helps you evaluate whether your compression is sufficient or whether additional optimization is needed. These guidelines represent practical targets that balance visual quality with load performance.
Blog featured images (800-1200px wide): Target 80-200 KB. A well-compressed JPEG or WebP at this resolution delivers excellent visual quality at these sizes. If your featured image exceeds 200 KB, additional compression or format conversion is likely needed.
Product photographs for e-commerce (600-1000px wide): Target 50-150 KB per image. Product pages typically display multiple images, so keeping individual file sizes low ensures the total page load remains fast. WebP format is particularly effective here due to its superior handling of product Photography details.
Thumbnails and gallery previews (200-400px wide): Target 10-30 KB each. At these small dimensions, even moderate JPEG compression produces visually clean results. Keep thumbnails under 30 KB to ensure gallery pages with 20-50 thumbnails load in under two seconds.
Full-screen hero images (1920px+ wide): Target 200-400 KB. Hero images demand higher quality because they occupy the entire viewport, but they should still be compressed aggressively. Use WebP format and quality 80-85 for the best balance. Hero images above 500 KB should be re-evaluated for optimization opportunities.
Frequently Asked Questions
Q: Does compressing an image always reduce quality?
A: Lossless compression reduces file size without any quality loss whatsoever — the decompressed image is identical to the original. Lossy compression at moderate levels (quality 75-85%) produces results that are visually indistinguishable from the original in normal viewing conditions. Only aggressive lossy compression (quality below 50%) produces noticeable quality degradation with visible artifacts.
Q: Can I compress a PNG image?
A: Yes. PNG compression can be optimized using tools like TinyPNG, which applies intelligent lossy compression to reduce the color palette while preserving visual quality. This typically reduces PNG file sizes by 50-80%. You can also convert PNG photographs to WebP or JPEG for even larger reductions, though PNG should be preserved for images requiring transparency.
Q: What is the best compression tool for batch processing?
A: For batch processing, command-line tools are the most efficient. Google's cwebp converts images to WebP, ImageMagick handles format conversion and resizing, and jpegoptim optimizes JPEG files in place. For non-technical users, TinyPNG's web interface and API support batch uploads of up to 20 images simultaneously on the free tier.
Q: Should I compress images before or after uploading to a CMS?
A: Always compress before uploading. While some CMS platforms (like WordPress with optimization plugins) can compress images during upload, the original uncompressed file still transfers over your internet connection and temporarily consumes server storage. Pre-compression ensures smaller uploads, faster processing, and control over the exact quality settings applied to each image.
Q: How do I know if my compressed image quality is acceptable?
A: Open the compressed image at its intended display size (not zoomed in beyond 100%) and compare it with the original. View both images on a standard-resolution monitor and a mobile device. If you cannot distinguish the compressed version from the original at normal viewing distance, the quality is acceptable. Tools like Squoosh provide real-time side-by-side comparison to make this evaluation easier.
Akbarak Engineering
Lead Technical Architecture Team
Dedicated to building high-performance web utilities and sharing in-depth knowledge on digital optimization, security, and next-generation web platforms. We simplify complex technologies for millions of users globally.